Monday, February 21, 2011

Please Don't Take My Sunshine Away

I don't know about you guys, but this weather is killing me! One minute it looks like spring is on its way, the next I wake up to a full on snow storm. I wish I was kidding but I'm not. I am so ready for spring, I'm ready for some photography, I'm ready for a tan because lets face it, my legs are truly embarrassing. I'm just ready! Can you tell?!

Jennifer, Kristin and I got together a few weeks ago and made some super adorable boards.  Lets just say, we channeled our weather frustration! Do you like?! Cause I love!!! This is one of my favorite projects ever!!!!

We started by painting one side our our boards cream. We literally coated that thing like 5 times. Once it was dry, we added our "you are my sunshine" vinyl. If you decide to do this project, you need to make sure the vinyl is completely down and sealed because you don't want the paint to creep under. Once you've reinforced the vinyl, paint over the top of the vinyl. We painted each layer relatively light. We painted maybe 3-4 coats, painting the last coat pretty heavily.

After your paint is completely dry, use some tweezers or something nice and pointy (skewer or something) to pull up the vinyl. Don't be too aggressive when you start pulling up the vinyl. This is truly the exciting part... its fun to see your board come to life!
Okay... one more step.... we sanded our boards, so it looked worn. For some reason, the paint came off extremely easy when I used my sander. I don't know if was because the paint was layered so heavily, if it was the wood or if my sander was just having a really good day, but sanding really added a different feel. I like both looks, but I think I favor the sanded look.


That's it... Our Sunshine boards are DONE! How much do you love it?!!!! This truly makes me so happy! Kristin and I both did green... check out Jennifer's board. She did this awesome burn yellow-orange color.
Now... if only the sunshine will start sticking around!!!!!

Tuesday, February 15, 2011

Floral Wall Art

My sweet husband bought me a sewing machine for Christmas... I'm a true beginner! Let me tell you! In an attempt to brighten up my living room and add some color, I made this super fun floral wall art. I love it! It totally brightens my little corner up and it is a little funky! Just what I like... bright and funky!


Have an awesome Wednesday!!!

Saturday, February 12, 2011

One Busy Valentines'

So Craftalicious has been VEry verY busy this crazy Valentines' day season. We find ourselves obsessed with spreading Valentine's throughout the house. Why wouldn't we?! We're talking flowers, chocolates, and kisses here people! Who doesn't like that?!

We have some very special projects in our "done" bucket (there's not really a bucket... I just made it up!). I'll just start from the top:


Project #1: 2x4 Heart
So craftalicious doesn't profess to being amazing creators, but rather copiers. We have our moments where we get creative and do our own thing, but this wasn't one of them. We found this project on Under My Polkadot Umbrella. So simple and so cute! 

Project #2: Big Heart Signs


I love these signs! This is a project we found at a local Hobby Center. It was a super easy project to put together. Just a little paint, wire and vinyl and we were done! I love that it can be hung or put on an easel. Tarah did an awesome job with the vinyl! I love having a vinyl lady in the family! Ha!

  Project #3: Little Heart Plaques


I don't know where Tarah and Jennifer found this awesome idea I love it! We just swapped out the paper for each plaque so they matched nice and pretty... and don't they look awesome?! Again, this project was really easy. Just a little modpodge and paper, maybe a little vinyl and ribbon and there you go! You're set!

As a bonus... I wanted to show you how Jennifer added some ribbon to her cute Heart photo holder we made. It's our very first project we posted. Oh... and by the way, it's a "So Craftalicious" original. That's right baby, that project came right out of a "So Craftalicious" head! Pretty awesome, huh! 


Happy Valentine's Day Crafters!

Tuesday, February 8, 2011

YW 2011 Theme Subway Art

Well I have seen many different options out there of ways to introduce the new theme for 2011 of the Thirteenth Article of Faith but our ward decided we wanted to give the girls a box at New Beginnings where they could keep spiritual handouts and such throughout the year and their lives. So I sat down and created my own Subway Art to stick on the lid of the boxes we found and just thought I would share with you how cute they turned out. Thanks to my trusty Silhouette and hours of peeling off vinyl we ended up with these for our New Beginnings handout and the girls loved them. Hopefully when they are our age they still have it stored with good memories.

Cute Valentine's Wreath

 
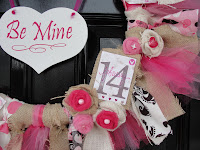
So everyone needs to have their door decorated for the holidays and my friend and I were looking for a fun whimsical wreath idea for the Day 'o Love. We kind of mixed a few ideas and ended up with this cute wreath made from burlap and tulle and a few scraps of material thrown in for more splashes of color.
I am sorry we didn't take pictures as we went but here is a run down of materials used and how we whipped this wreath together.

Materials - one wreath we got ours from the dollar store (one of ma favorite craft supply stores)
burlap - we had 2 colors but totally optional
tulle- we also had 2 colors of tulle
material - just scraps we had around I stuck with the brown tones and AmyLee went with the black. It is always fun to work on the same project together and see how different things turn out.
Embellishments -  we added a few stamped tags with some words o' love to add an extra element to the wreath. Burlap and tulle hearts with little jewels.
Then throw a store bought heart in the center (optional of course) and with my trusty silhouette added the Be Mine and voila! You have the cutest door on the block!!!


Wednesday, February 2, 2011

Holy One Subway Art

Subway art is crazy in right now, huh? Well, we didn't want to leave ourselves out! The Craftalicious girls being left out... I DON'T THINK SO! We wanted to make something we could keep up all year long though. We decided to use the words of the Savior.Inspired by a sign found at  http://ishowoffcrafts.blogspot.com/search/label/holy%20names   I'm amazed at how many names we know Christ as... Light of the World, Prince of Peace, Everlasting Father... and so many more!

These projects ended up being pretty big in size. We found some AWESOME scrap wood at Lowe's... talk about lucky! We just painted the wood up, sanded of course, because it wouldn't be perfect unless there was a little imperfection added... then of course the vinyl. I love how they turned out! I did mine a deep turquoise. I decided that I'm sick of neutrals in my house! I'm desperate to add color and this was a great way to do that!

Oh... and my husband is obsessed with the "W" in Light of the World because there's an extra swirl... He's brought it up several times. Just when you don't think they care, they come up with the weirdest observations! ****sigh**** Husbands! 


Tuesday, February 1, 2011

A Delicious Valentine's Topiary


Jennifer made these adorable Valentine's Day Topiaries. They look so craft-a-licious and delicious!!! Jennifer is so super crafty and when it comes to candy and crafts, she's not messing around! She bought most of her materials at the dollar store. 3 glasses $1/ea, 3 pk wooden spoons $1.00, 3- 2" styro-foam balls $1/ea. The most expensive was the candies which she got bulk: Hot Tomales, gum drops, Jelly Beans, and Good'n'Plenty. Her inspiration was from  
http://craftysisters-nc.blogspot.com/2010/09/trickor-treat-topiaries.html 

So you just need a base heavy enough to balance the weight of the candy top and why not fill it up with candy to help out with the stabilization of the topiary. Then you paint the wooden spoon handles and the styro foam balls. Then jab the "non-spoon" end into the center of the styro-foam ball and start hot gluing on your candy one piece at a time. (One piece on the ball, one piece in your mouth and repeat until fully covered)


Jennifer said this is the only way she can allow candy into the house - since it is glued down!