Friday, April 29, 2011

D is for Dang Awesome (and my last name)

Let's here it for inspiration, right?! Well, a few months back I found this awesome photo and of course I fell in love with the whole look but especially the gigantic "F". I decided I needed to use some of that inspiration, or at least copy it! So, the thing is, I didn't want my gigantic "D" to look pitiful, I wanted it gigantic, you know? So I had to figure out how to get it cut and look'n awesome.

Then.... I saw this bad-boy... I know you can't see how big it is, and I know it's not exactly what I wanted, but I love how skinny and fabulous this looks. I found it at Joann's for $10 and I didn't even have to stress about how to get it cut. It was that easy. The size has to be 2.5 x 1.5. It's nice and big!

Sorry my photo is so BLUE!!!! I didn't get a chance to edit them!
I thought I'd give it a nice metallic look. Steel is cool, right? So I got some metallic silver paint and went to town on it. It looked really cool, but cool isn't enough for someone who reads Vintage Revivals everyday, right? So, I added some black paint. The technique is pretty basic, exspecially compared to Vintage Revivals, but hey, simple is good! I'm okay with that. All I did was add a dab, then wiped it off with a paper towel, spreading the black paint to each side of my project and that's all I did. And I'm officially in love with my new letter "D"!

Thursday, April 28, 2011

Desserts / Stressed?

Hello...

So... I've got a fun post for today. I saw this awesome sign on Lil' Luna, which is one of my favorite blogs. We all loved how cute these signs came out and decided to do them exactly how Lil' Luna did.

Kristin got us a bunch of cabinet doors through a contact of her husband's. We spray painted them black, added the vinyl which Tarah cut and then made fabric flowers. It was fun mixing all the different flowers and adding fun buttons and stuff for the centers. I love the way this sign looks in my kitchen. It's nice and big and bold. LOVE that!

Now go have yourself some desserts you stressed out people!

Friday, April 22, 2011

Pillows to Die For

Last Tuesday, us So Craftalicious chicks got together and made table runners. Unfortunately, I don't have photos of them yet, however, Kristin made pillows instead. They turned out so adorable. Of course now we're all dying to make them. They are too cute! When we make some for ourselves, we'll turn it into a tutorial for ya. Also, I'll get our latest projects up this weekend.

(The pillow on the rocking chair is an itty-bitty pillow. That rocking chair was Kristin's when she was a little girl and now it belongs to Kristin's little girl Ashlynn)


Sunday, April 3, 2011

Happy Birthday Banner

When we first started "So Craftalicious" (we didn't have a name back then), we decided to make fun birthday stuff to put in a "birthday box" and pull out anytime someone was celebrating a birthday. This is one of the things we made to put into the "birthday box". Just a side note: This isn't a quick project. It took us two Tuesdays to get it done which is kinda mega for us Craftalicious girls.

Okay... here's the tutorial:

We, I mean,  Jen started by cutting and drilling the wood. Jen's such a sport! I love her so much!

Then we modpodged our paper onto the wood. This is probably the hardest part. Not because modpodging is hard but having to decide on the paper is crazy. Exspecially because there is such cute paper out there. I just want to use it all!


Next, you add all the ribbon around the triangles. We used hot glue. Then, we added our letters. This is just cardstock cut with the Sillouhette. The best gule to use is the white double tipped tombo glue. This glue works wonders and you can control how it spreads by using the wide rubber edge. I love Tombo!!!

 Then add your fun stickers or whatever you want to put on there. Just wait until you see it hang! They're so awesome!!!!


That's it... you're done! Pretty cute and fun to put in your Birthday Box. Just hang that baby up the week of your kid's birthday and they'll feel like a rockstar all week long.

Thursday, March 31, 2011

Easter Tree

Kirstin and I decided to get together and make these adorable Easter Trees. They were SUPER easy. In fact, I think from start to finish it took an hour. So... there was lot of chatting time. Kristin and I really know how to chat. So, if you need a quick craft... this is the lucky winner!

We started by getting pails. I filled mine with sand and I think Kristin used Styrofoam. Do you think she was trying to show me up? I think so....  Well.... fine. Whatever Kirstin! We picked our sticks, put them in, added the mossy-grass stuff and clued it in. I know what you're thinking... how did you glue mossy-grass stuff to sand. Well... I glued it to side of the pail. Lets just hope Miley Pepper (My cute black pug) doesn't get crazy and knock it over. You never know with her!

After the sticks were in place, we added the eggs. We just tied a knot and glued it to the egg and then added them to the tree. We finished by adding the bow. They're so cute and fun for Easter.


Okay... Now let's just hope Miley Pepper doesn't knock it over!

Wednesday, March 30, 2011

Spring is Here!

So... my most favorite blog in the whole entire world is the House of Smiths. In fact, if I could I would pay her to come to my house and change EVERYTHING! Shelly is amazing and her style is PERFECT. Love it! I was stocking looking through her blog and found her adorable Spring Board. I loved it and e-mailed it to the So Craftalicious girls like 5 times begging to make it. Thank goodness they loved it too cause I was dead-set on making that baby, with or without them.

So... here is the tutorial on how to make the rosettes. They're SO much easier than they look and once you get one or two down, you're good to go. Don't burn your fingers with the glue gun... that's my only advice.

Oh... and here's another tidbit of information: When you get your wreath, we all went with straw wreaths. I used a 10 inch wreath which is pretty big compared to the House of Smiths' board. If you can find a smaller one, go for it. If you like it big, then go with the 10 inch.

I made a cute topiary to go with the board. I got a topiary foam form from thing Hobby Lobby. I just added the flower pot, green mossy-grass stuff and glued those puppies right on the form. That's all it took. I love the way it turned out! So... thank you House of Smiths for inspiring us So Craftalicious girls!

Wednesday, March 9, 2011

Kristin, Our Awesome Ring Model

She's so going to kill me, but I have to do it! Ha ha!!!

This is Kristin. She one of my most awesome friends ever! She's officially the newest part of So Craftalicious. She doesn't know I took her photos off from facebook... she's going to kill me! It's so worth it!


Kristin and I met 12 years ago. We worked at Papa Kelsey's in Rexburg while we went to School at Ricks College... I just aged us, crap! We used to have so much fun together and have so many fun memories. She got married and I moved on and randomly like 2 years ago I got a facebook account and I found her! It was AWESOME!

I love that when we met up it felt like no time had past! She just reciently moved to Boise and it was like my dreams had come true! My crazy, inappropriate (self proclaimed "I have the sense of humor of a seven year old boy"), gorgeous friend was back! In no time at all, she was coming to craft night. She's the one who always models the distress ink or paint brush... she has the cutest rings ever. Why waste a good photo with a non-cute ring on your finger. You know what I'm say'n?!

Kristin has a 3 year old adorable little girl named Ashlynn who is awesomely random and knows how to pull some serious moves with her eye-brows. I love the Ashlynn stories!

Anyways... Kristin is awesome and she's worth adoring. Just like the rest of the Craftalicious girlies! We have a great time and I'm so glad she's here!

Stackers

Say hello to our little Stackers! They're so cute, aren't they!!! Tuesday's craft night was ON and we pumped these little stackers out so quickly. And aren't they so cute?! I love them!


We started with sanding, then painted. We then mod-podged the paper on. A question that came up last night was "do we mod-podge the top of the paper?"... Really, it's your choice, but we've noticed, well, our awesome vinyl lady Tarah noticed that when she stored some holiday projects from last year topped with mod-podge, things stuck together. So, we don't mod-podge the top of things. Plus, we like the natural matted look, not the glossy stuff. Again... it's really your choice!


After the mod-podge was dry, we sanded the edges and then did a little distressing. Distressing is my very favorite thing in the world.... Then we added the vinyl. That's how easy this one was. You probably could of figured it out for yourself, but it makes me feel important to share my wealth of knowledge I've gained from the experience. Thanks for letting me feel like a real VIP!

As soon as all my fun Spring stuff is done and put together, I'll have to post a photo so you can see how fun it's all coming together! Spring is on it's way, right?! Idaho weather is so bipolar!

Have a good one Craftalicious chickies!!!

Sunday, March 6, 2011

St. Patricks Day Wreath

Hello! It's about time we update this baby, huh?!


It's been a busy couple of weeks here in our little craftalicious world. Unfortunately not busy with crafts... but we're back on this Tuesday! I'm so excited!

Here is a wreath we made a few weeks ago. I love this thing! I got the idea from Lucky Star Lane. See... we are total copiers! Why wouldn't we when we find such adorable things to make, right?!

Here's how we made it:

I started by finding an old book with yellowish pages in it. I don't think the book was that old. My husband was concerned when he found out we weren't reading the book before we destroyed it, but hey... that's the way Craftalicious does things. We don't mess around when it comes to crafts. After you find your book and get all your supplies, you start by rolling the paper and gluing them together and pinching one end. BTW... you will burn your hands A LOT with the glue gun on this project. The pages are a little too thin to be using such hot glue.

We also distressed the edges of the paper after they were rolled.

Can you tell we have a good time, check out the way those brownies have been destroyed! OHMIGOSH there's a cake in that picture too! Party time!!! Ha!


You will need a cardboard circle to glue your rolled paper to. I bought the cardboard you put under cakes. It worked perfect and beat cutting circles out of card stock. Go ahead and clue your rolled paper to the cardboard. We started with the edge, gluing completely around the cardboard, then started with the second layer. The third layer was obviously the polka-dot green. I have a personal relationship with polka-dots. Don't judge me! I just love them, always have and always will. You should of seen my wedding!


Once you have everything glued on, go ahead and glue on the center. I got these at Hobby Lobby. I thought it was perfect for the center of the wreaths.


 Okay... here is is!! All finished! What do you think?! I love it. It's so fun and is perfect for St. Patricks day!

Monday, February 21, 2011

Please Don't Take My Sunshine Away

I don't know about you guys, but this weather is killing me! One minute it looks like spring is on its way, the next I wake up to a full on snow storm. I wish I was kidding but I'm not. I am so ready for spring, I'm ready for some photography, I'm ready for a tan because lets face it, my legs are truly embarrassing. I'm just ready! Can you tell?!

Jennifer, Kristin and I got together a few weeks ago and made some super adorable boards.  Lets just say, we channeled our weather frustration! Do you like?! Cause I love!!! This is one of my favorite projects ever!!!!

We started by painting one side our our boards cream. We literally coated that thing like 5 times. Once it was dry, we added our "you are my sunshine" vinyl. If you decide to do this project, you need to make sure the vinyl is completely down and sealed because you don't want the paint to creep under. Once you've reinforced the vinyl, paint over the top of the vinyl. We painted each layer relatively light. We painted maybe 3-4 coats, painting the last coat pretty heavily.

After your paint is completely dry, use some tweezers or something nice and pointy (skewer or something) to pull up the vinyl. Don't be too aggressive when you start pulling up the vinyl. This is truly the exciting part... its fun to see your board come to life!
Okay... one more step.... we sanded our boards, so it looked worn. For some reason, the paint came off extremely easy when I used my sander. I don't know if was because the paint was layered so heavily, if it was the wood or if my sander was just having a really good day, but sanding really added a different feel. I like both looks, but I think I favor the sanded look.


That's it... Our Sunshine boards are DONE! How much do you love it?!!!! This truly makes me so happy! Kristin and I both did green... check out Jennifer's board. She did this awesome burn yellow-orange color.
Now... if only the sunshine will start sticking around!!!!!

Tuesday, February 15, 2011

Floral Wall Art

My sweet husband bought me a sewing machine for Christmas... I'm a true beginner! Let me tell you! In an attempt to brighten up my living room and add some color, I made this super fun floral wall art. I love it! It totally brightens my little corner up and it is a little funky! Just what I like... bright and funky!


Have an awesome Wednesday!!!

Saturday, February 12, 2011

One Busy Valentines'

So Craftalicious has been VEry verY busy this crazy Valentines' day season. We find ourselves obsessed with spreading Valentine's throughout the house. Why wouldn't we?! We're talking flowers, chocolates, and kisses here people! Who doesn't like that?!

We have some very special projects in our "done" bucket (there's not really a bucket... I just made it up!). I'll just start from the top:


Project #1: 2x4 Heart
So craftalicious doesn't profess to being amazing creators, but rather copiers. We have our moments where we get creative and do our own thing, but this wasn't one of them. We found this project on Under My Polkadot Umbrella. So simple and so cute! 

Project #2: Big Heart Signs


I love these signs! This is a project we found at a local Hobby Center. It was a super easy project to put together. Just a little paint, wire and vinyl and we were done! I love that it can be hung or put on an easel. Tarah did an awesome job with the vinyl! I love having a vinyl lady in the family! Ha!

  Project #3: Little Heart Plaques


I don't know where Tarah and Jennifer found this awesome idea I love it! We just swapped out the paper for each plaque so they matched nice and pretty... and don't they look awesome?! Again, this project was really easy. Just a little modpodge and paper, maybe a little vinyl and ribbon and there you go! You're set!

As a bonus... I wanted to show you how Jennifer added some ribbon to her cute Heart photo holder we made. It's our very first project we posted. Oh... and by the way, it's a "So Craftalicious" original. That's right baby, that project came right out of a "So Craftalicious" head! Pretty awesome, huh! 


Happy Valentine's Day Crafters!

Tuesday, February 8, 2011

YW 2011 Theme Subway Art

Well I have seen many different options out there of ways to introduce the new theme for 2011 of the Thirteenth Article of Faith but our ward decided we wanted to give the girls a box at New Beginnings where they could keep spiritual handouts and such throughout the year and their lives. So I sat down and created my own Subway Art to stick on the lid of the boxes we found and just thought I would share with you how cute they turned out. Thanks to my trusty Silhouette and hours of peeling off vinyl we ended up with these for our New Beginnings handout and the girls loved them. Hopefully when they are our age they still have it stored with good memories.

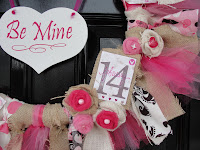
Cute Valentine's Wreath

 
So everyone needs to have their door decorated for the holidays and my friend and I were looking for a fun whimsical wreath idea for the Day 'o Love. We kind of mixed a few ideas and ended up with this cute wreath made from burlap and tulle and a few scraps of material thrown in for more splashes of color.
I am sorry we didn't take pictures as we went but here is a run down of materials used and how we whipped this wreath together.

Materials - one wreath we got ours from the dollar store (one of ma favorite craft supply stores)
burlap - we had 2 colors but totally optional
tulle- we also had 2 colors of tulle
material - just scraps we had around I stuck with the brown tones and AmyLee went with the black. It is always fun to work on the same project together and see how different things turn out.
Embellishments -  we added a few stamped tags with some words o' love to add an extra element to the wreath. Burlap and tulle hearts with little jewels.
Then throw a store bought heart in the center (optional of course) and with my trusty silhouette added the Be Mine and voila! You have the cutest door on the block!!!


Wednesday, February 2, 2011

Holy One Subway Art

Subway art is crazy in right now, huh? Well, we didn't want to leave ourselves out! The Craftalicious girls being left out... I DON'T THINK SO! We wanted to make something we could keep up all year long though. We decided to use the words of the Savior.Inspired by a sign found at  http://ishowoffcrafts.blogspot.com/search/label/holy%20names   I'm amazed at how many names we know Christ as... Light of the World, Prince of Peace, Everlasting Father... and so many more!

These projects ended up being pretty big in size. We found some AWESOME scrap wood at Lowe's... talk about lucky! We just painted the wood up, sanded of course, because it wouldn't be perfect unless there was a little imperfection added... then of course the vinyl. I love how they turned out! I did mine a deep turquoise. I decided that I'm sick of neutrals in my house! I'm desperate to add color and this was a great way to do that!

Oh... and my husband is obsessed with the "W" in Light of the World because there's an extra swirl... He's brought it up several times. Just when you don't think they care, they come up with the weirdest observations! ****sigh**** Husbands!